


Recovering Small Playing Pneumatics
Recovering the small playing pneumatics is one of the more common jobs done when restoring pneumatic instruments such as player pianos, reproducing pianos and orchestrions. It is very rare to find an instrument still playing with its pneumatics still covered with their original material. Even if they look serviceable it is most likely that once the instrument has been played a few times it will start to leak and play in a sub-standard manner. It is always best to recover the playing pneumatics on an original instrument and even one that has been restored over thirty years ago. Modern materials can have a useful life much less that those used for original manufacture in the first few decades of the 20th century so if you are unsure, replace the material. For those readers who are unsure of what I mean by a ‘pneumatic’ this is the small bellows that operates the piano action. It comprises two thin boards of wood, hinged together and covered with thin rubber cloth, also known as ‘tosh’ (an abbreviation of Mackintosh). Tosh is about 7 thousandths of an inch thick and is a thin layer of rubber over a cotton backing. Good tosh is getting hard to find. It must be made of cotton as some artificial materials cannot be glued reliably to wood with hot glue, and you must never use modern chemical glues for this job and it will make life very difficult for the next restorer.
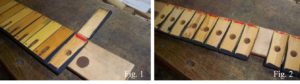
Removing the old pneumatics from the valve board
This is the first job and if not done carefully can result in a lot of making good before you start the recovering part of the job. Fig 1 shows the valve board upside-down. All the output arms have already been removed from the moving boards of the pneumatics and all parts have been numbered so they will go back in exactly the correct position. These instruments were all handmade and small variations exist, such as the lateral position of the outlet arm may vary so as to line up with the position of the piano action wippen. Each ‘fixed’ board must be removed from the valve board with as little damage as possible. The standard texts on this subject advise chiselling the boards away. This can be made easier if you are restoring a quality instrument where the manufacturer has added a thin paper or leather gasket all the way along this joint. My method is based on many years of experience and involves the use of a domestic iron. Please do not use your wife’s best iron as this will inevitably result in divorce. Buy your own! This is also a very smelly job so do it in your workshop or ensure your wife (or husband ) is out for the day. Remove all moving boards as shown in Fig 2. They are easily cut away with a sharp knife. Now set your iron to hot and place it over the boards and hold it there for a few minutes. The heat will pass through the thin wood and slowly soften the hot glue used in the original manufacture.
After a while you will be able to prise off the boards. The boards removed will be slightly bent but should recover their flatness after a few minutes. Once cold, all parts can be trued up on a sanding bench. The advantage of traditional hot glue is that parts can be separated by the use of heat, and when cold, it can be easily sanded away. Modern glues must never be used. Please see my previous article on this subject.
Making the hinge
After thoroughly cleaning the wood and truing up any dimensional anomalies the boards must be hinged together. Fig 3 shows how this is done. A thin spacer must be glued to one board, as this ensures that the cloth folds easily towards the hinge end. A small felt circle can also be glued to the centre of one board to prevent the two boards closing tight against each other. This is thought to extend the life of the cloth, although, of course, once installed and correctly set up, the pneumatic should never close up completely.

Fig 3 shows a thin card strip being used as the spacer, with the thin cotton tape being glued over the two ends, butted up tightly. Once set, the two boards are folded closed, ensuring the two open ends line up perfectly.
Recovering the pneumatic
Fig 4 shows the easiest way of gluing the tosh to the two boards. Strips of tosh are cut to the width of the fully open span of the pneumatic. This should be measured from the old ones before they are removed. The length of the strips should be slightly more than the circumference of the boards to allow for the overlap at the hinge end. The hinged boards are glued lightly on their open ends and upended over the centre of the tosh strip, as shown. I do ten at a time and once the tenth has been glued, the first is ready for the next operation. The pneumatic is now laid flat and the upper side tosh is laid away as shown in Fig 5. The top edges of the boards are now lightly glued and the tosh folded over immediately and lightly pressed into place. As the hot glue cools, the tosh is held in place. No clamping, elastic bands or tape is required. Once one side is done, turn over and repeat, so the result will look as in Fig 6. The correct method for covering the hinge side is to close the pneumatic first. This is especially important for larger bellows with thicker cloth, but it is also good practice to do this for these small bellows. Hold the bellows closed with a clip, elastic band or piece of masking tape, then trim the free ends so they overlap by a small amount, say 6mm, with the joint in the middle of the hinge side and not near to the corners. Let the glue harden before removing the clip.

Once the glue has gelled, but before it has fully hardened, say one hour, trim off any excess cloth with a sharp knife. As long as you have not used excessive amounts of glue, the pneumatic will now operate freely. If in doubt, do the job again.

The finished pneumatics are shown in Fig 7. Both are from the same instrument but have different designs of output arms. The wooden arms are screwed and glued in place whereas the metal arms are cleaned thoroughly with a wire brush and then screwed in place with burnt shellac which adheres to the metal surface. Do not be tempted to use a modern epoxy. The manufacture and use of burnt shellac is discussed in my previous article on glues.

The completed pneumatics are glued back onto the valve board with a thicker mix of hot glue, and held in place by hand for a few moments until the glue gels. Subsequent hardening of the glue will also pull the pneumatic closer to the valve board, making a perfect seal. I follow the practice of lining the bottom of the valve board with thin paper, which will make life much easier for the next restorer, and also of signing my work, which I believe adds historical interest and record to these instruments.
Nicholas Simons